Folders
What Folders are
The Gravity Flow Folders Extension allows Gravity Flow administrators to organise workflow entries into logical groupings for their business/use cases. They can optionally be displayed on the front-end of your website (via Blocks or Shortcode) and always accessible via the WordPress admin UI.
What Folders are not
Folders are not directories stored on your web servers storage. Meaning you would not see folders created in your WordPress uploads directly. Rather these folders are stored as entry meta.
Getting Started / Documentation Links
There are step types for creating folders, adding entries to the folder, and removing entries from them.
Your environment would need to have the following plugins installed:
- Gravity Forms
- Gravity Flow
- Gravity Flow Folders
- Gravity Flow Form Connector (This is not needed for Folder functionality specifically, but is used in our example workflow.)
You can also configure a page on your website to display all, or some, of your folders.
A Sample Folders Based Business Process
The demonstration is based around the concept of a court or law firm which has to track multiple activities within a case (Folder). It is built across 2 forms with a different set of workflow steps in each:

The New Case Form
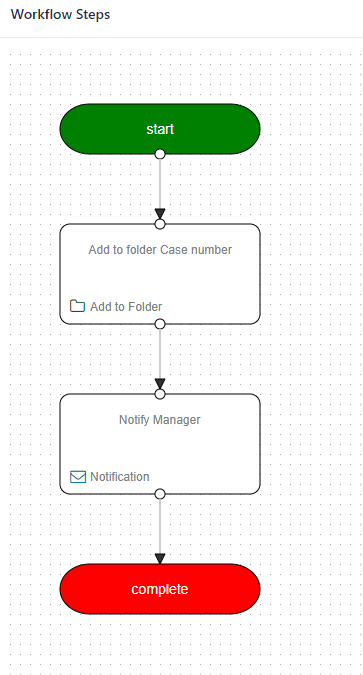
The first form that would be submitted by a staff member of the court or law firm which has 2 steps:
- Add Folder – Case Number
This step uses the merge tag of the ‘Case Number’ field to create a new folder titled by it. - Notification – Notify Manager
This step notifies the administrator a new folder has been created.
This form also uses two snippets of custom code:
- gform_replace_merge_tags filter is hooked for merge tags {admin_url} and {site_url}.
This would not be required in your environment unless you are creating multiple subsites. - gravityflow_step_complete action is hooked to fetch the ID of the newly created folder and store it in the ‘folder_id’ field. The merge tag of this field is used to share the direct link of the folder in the form confirmation.
The New Deposition Form
This form is used to capture every deposition for a case and may be submitted multiple times. If your business had many different processes that you wanted to group together using the same case, the concepts of this form would be duplicated. It has steps for:
The dropdown field ‘Folder-Case’ lists all the folders that were created by the New Case Form. The submitter will need to select the desired folder. The folder name is also the case number, this value will be used to fetch details of the correct case later in the workflow.
The workflow has the following steps:
- Update entry from New Case
This Update Fields step looks up case details from the ‘New Case’ form and populates details like the court where the case is filed in, details of the attorneys of both the parties. - Add to folder InProgress
This step adds the new deposition will add deposition to a folder named casenumberInprogress. All InProgress depositions will be in their respective CasenumberInpProgress folders. - Record Interrogation
This User Input step is assigned to an executing who will type the entire interrogation. - Signed and approved by representatives of both parties and deponent
This Approval step uses Field Conditional Logic to capture signatures from all three parties, i.e. the two attornies and the dependent. - Admin Review
This User Input step is assigned to an Admin to clear/correct any type of discrepancy the three parties may think there is, once those are corrected, the workflow goes back for signature. - Send details to all parties
This Workflow Notification step is sent to all parties for them to keep a record. - Remove from folder -InProgress
This ‘Remove from Folder’ workflow step uses the hook gravityflowfolders_folder_match_remove_step to remove from the InProgress folder. - Add to folder Verified
This Add to Folder workflow step adds the deposition to the Verified folder. The name of the folder is in the format CasenumberVerified. All verified depositions for the case would be in their CasenumberVerified folders.
Experience The Process
- Submit the New Case Form
After submission, the confirmation will show the link to the newly created folder. Click the link to check and confirm the new case added to this folder. A notification will also go out to the manager confirming the creation of the new folder. Now that the case has been added we will add depositions to it. - Open the New Deposition Form
The ‘Folder-Case’ dropdown will list all the case folders. Select the desired one. You would want to be careful to select the correct case folder else the depositions will get added to the wrong folder. Also, the Update Fields step will fetch details from the wrong case. - Record Interrogation
The entry is now ready for recording deposition by an executive. - Sign and approved by representatives of both parties and the deponent
Once the deposition is submitted it needs to be approved by all three parties, i.e. the Plaintiff, the Defendant, and the Deponent. - Administrator Review
This step will only execute if the entry is Rejected by any one of the parties.
The entry comes to Admin for review, corrected and sent for signatures again.
Access The Folders
Folders can be accessed in multiple ways.
In the Admin Dashboard via the Workflow > Folders page
In the Admin Dashboard via the Users list view with a link that goes to the specific folders the selected user has access to.
On the front-end of the website (shown below as example)

